Showing posts with label diy crafts. Show all posts

Friday, August 14, 2020

Splatter Screen Pumpkin


Splatter Screen Pumpkin magic! That's what I say.  This is another craft that I saw on Pinterest and in some of the craft groups I follow.  I had to try it.  Dollar Tree splatter screens, leaves, metal 'welcome' sign, jute, flowers and a whole lotta fun! I'm in!! 

This was so easy and so stinkin' cute!! I bought 3 splatter screens and used Rustoleum rustic orange indoor/outdoor paint to coat the frame and the screen.


Once those dried, which didn't take long at all.  I initially hot glued a few spots to hold the screens together to form a pumpkin but as I started working with it, that glue didn't hold very well.  So, I wrapped the handles with jute, hot gluing it as I went.  I later put a few dabs of hot glue on the screens once again, just for stability.  I saw in other posts and pictures how some people took the two outside screen handles, flipped them so they were at the bottom and bent them backward to create a 'stand' so the piece could be displayed upright on a table or shelf.  Super cute! But I didn't see that until AFTER I made this.  Ha! Either way, I wanted to hang it on my front door so it worked out. 


For the center part, when I lined it, I just glued the glue right on top of the screen to make it look like it was lining the frame of the overlapping layers under it.  That worked out perfectly. Now it was time to place some leaves and flowers!  I loved the lighter colored flowers with the burlap petals on the inside! So cute and such a great accent!


Once I placed the flowers I decided to create a few little spiral vines coming off the stem of the pumpkin. You know those little green twirly thingys? What do you even call them? I had some green wire and decided to wind it around a pencil to create the spirals. Then I fed them into the twine, and twisted to secure them. 


Because I wanted this to hang on my door I knew I'd have to find a creative way to incorporate a 'hanger'.  So let me back up just a little.  Before I wrapped the stem of the pumpkin with jute, I created a loop to hang it from.  I wrapped the bottom of it around the base of the stem and then kept it centered while I continued to wrap the whole stem with another piece of jute.  The idea was to keep the piece for hanging secured in place for more stability.  I didn't want the pumpkin to teeter back and forth if the hanger wasn't secure.  Make sense? I added some green leaves around the base of the stem as well. 


I couldn't decide easily where I wanted to place the 'welcome' sign.  It's a little metal sign.  I also couldn't decide if I wanted to leave it raw metal or paint it. I decided to leave it raw.  I really liked doing this one and I hope you all like it too! It was simple, not too busy (like I usually tend to be with my crafts) and the perfect size for my front door! 


If you enjoyed this blog post, please check out some of my other posts with other cute, easy, inexpensive crafts that I've done.  My next blog will be another hanging pumpkin craft that I made using the Dollar Tree pumpkin wire wreath frame.  A little busier than this one but so, so cute!! 

Please share with your friends and family and be sure to check out my Facebook Craft Page for live videos and more!! Thank you so much for stopping by my blog today and supporting me in my crafty adventures!! 

Happy Crafting, y'all!! 


Tuesday, July 28, 2020

Baby name blocks

Often, I get my ideas from crafts other people have made, craft shows, commercials, ads on FB, or even someone else’s house, like at a party of some sort. I rarely follow a recipe or instructions and my crafts are no different!! 

THIS idea was one I saw on Pinterest while looking for ideas for the diaper cake in my previous blog entry. It’s for the same momma but this was a gift from me. I knew she was having a girl and I knew she was doing baby’s room in a feminine, jungle theme. Again, I shopped several different stores over a matter of months and this little beauty is what I came up with. 


I had no idea what direction I was going with this when the idea struck me.  This was the picture that I saw on Pinterest (I have no rights....it belongs to bitsyblocks)


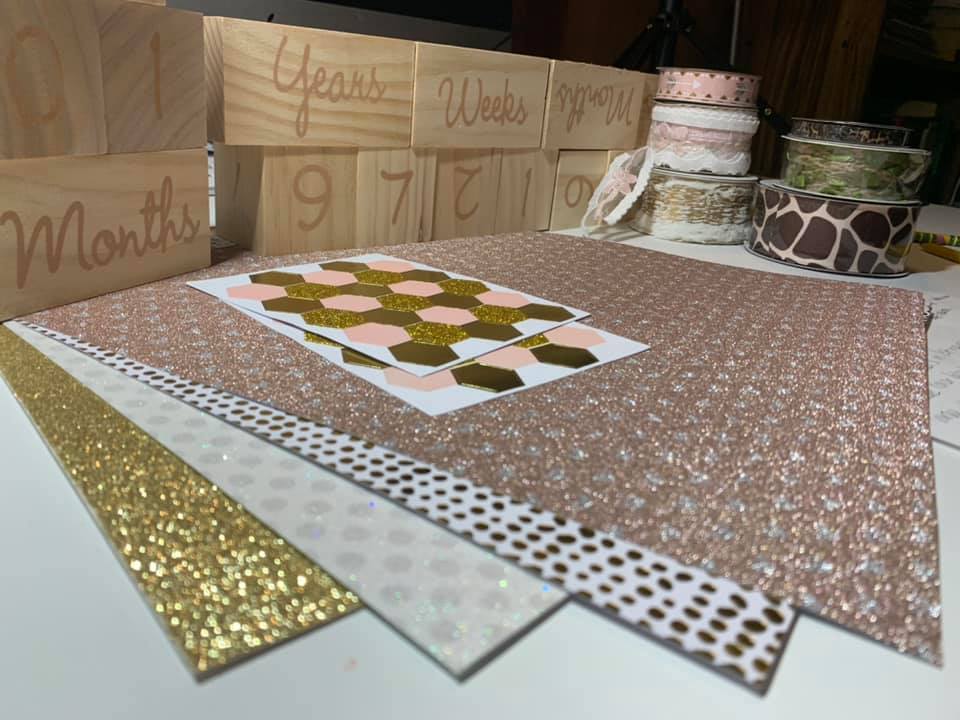
I love these blocks and this idea so much you guys!!! But I wanted to make it match her theme so I knew I had some brainstorming to do!  I was at Target one day and saw the cutest 3-block set.  They were made to display the days/weeks/months/years of a baby's life.  You could flip/arrange the top two blocks to the desired numbers and the bottom one you could flip between days/weeks/months/years.  I knew I was going to paint them because it was unfinished wood.  But the rest I was just going to have to figure out as I shopped!  I found a lot of what I needed at Hobby Lobby but also shopped Michael's, Joanne Fabrics, Dollar Tree and Walmart. (You may recognize some of these things from the previous blog as they were used for both the Baby-Q diaper cake and this block craft).  Here's most of my haul:


You can see the blocks they way I bought them, above.  I was determined to make this into something incredible and I don't think I missed the mark! I sanded down the blocks so that when I painted over them you wouldn't be able to see the numbers/letters.  I knew that was going to be tough and boy was I right!  I didn't have the right kind of sand paper. And what I think I should've done was use a primer.  That took some time...and SEVERAL coats of white chalk paint!  After the paint dried I decided I was going to do different designs for each block.  I covered the sides with different patterns using the scrapbook paper that I picked out at Hobby Lobby, above.  Those little honey comb stickers were too cute to pass up but I didn't end up using those.  


I didn't have gold paint, nor did I think it would work well to try to paint these letters so I used a gold paint pen.  It was NOT cooperating with me at all but once I started I was ALL IN!  I was determined to make this work!  I didn't do this one in a live video so I'll try to explain a few things the best I can, for those that may be interested in how I did it.  You won't be surprised to hear that I didn't measure anything.  I honestly don't even know why I own a ruler of any kind. Seriously.  

I randomly picked which paper pattern would go where, as I went along.  I didn't preplan how many of what pattern or anything like that. Totally winged it, as usual.  Instead of measuring, what I decided to do was coat the side of the block I was working on with mod podge and lay it on whatever paper I was coating that side with. Then I used an Exacto knife to cut around the block.  If more than one side of the block had the same pattern of paper, I left one side 'uncut', coated it with mod podge and rolled it to cover that side and so on. Does that make sense? Maybe I should've used the word 'turned' instead of 'rolled'.  Once I had the individual blocks all covered with paper I set those aside. 

For the bottom blocks that have babies middle and last name, I put two of the long blocks together, adhering them with hot glue.  Once they were dry, I hot glued a ribbon around the top of the two I glued together and another ribbon around the bottom.  This helped hold it in place.  I wrote the words on those blocks after I adhered them and before I wrapped the ribbon.  

The ribbons were adorable!! But when I reached the point of adding them I really wished I'd picked up a few more patterns.  I chose the giraffe ribbon for the top block because it was kind of wide and I didn't want that to detract from the rest of the blocks if I had it somewhere in the middle.  It was also too wide to wrap around the bottom blocks.  In order to create another pattern I decided to wrap some lace around one block and accent with twine. THAT turned out super cute!!  

I kept one set of blocks to use for the calendar and put those on the very top, above baby's name.  I really hope momma liked this gift. I sure had fun creating it!!  

Thank you so much for stopping by my blog once again! I hope you enjoyed this short little description of this super adorable and fun craft!  

Don't forget to check out my Facebook Page and share with your crafty friends and fam!! 

Have a wonderful week and stay tuned for more super fun crafts here in my blog and on my Facebook Page, where's I'll be doing another live video VERY SOON!!! 

Happy Crafting!